👥Club/☁️9oormthon univ☁️
☁️ 토이 프로젝트 - React+TypeScript+Next.js 📋
비엔 Vien
2025. 5. 28. 13:55
자 저는 감자기 때문에
봐도 봐도 모르기 때문에 강의를 다시보며 합니당. ㅋ
Props : 43 44
다른 파일에서 해당 메소드 사용가능하려면
export default function Header {
	~~
}
그리고 다른 파일에서 가져오려면
import Header from './components/Header.jsx'
48강의 - children
49 이벤트 처리하기 (onClick 같은거)
50, 51(매개변수 파라미터 넣어주는 경우는 종류 구별할때??)
52 tabcontent button
53 reactHook와 state ,
54 뭐 아래 내용 여러개 뜨게 하던거
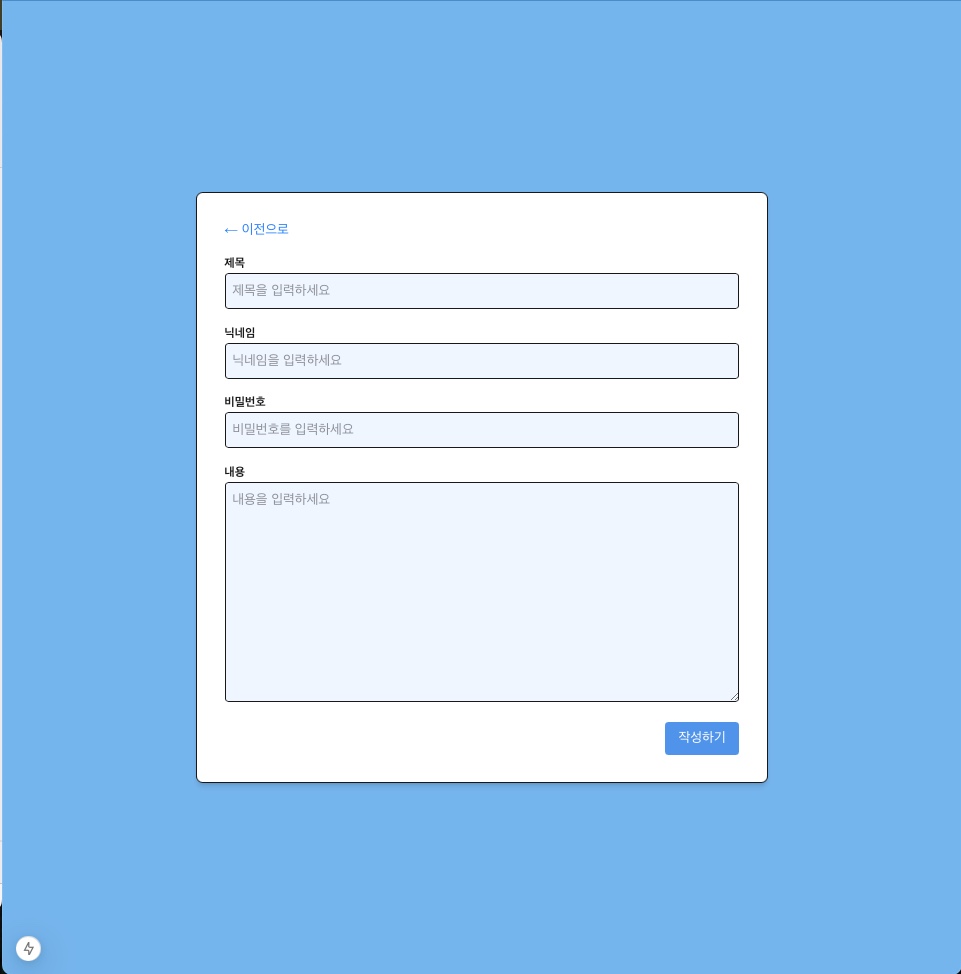
    <main className="min-h-screen bg-[rgb(117,181,237)] flex items-center justify-center px-4 py-8">
      <form
        onSubmit={handleSubmit(onSubmit)}
        className="w-full max-w-2xl bg-white border-2 border-[rgb(0, 0, 0)] rounded-lg p-8 shadow-md"
      >
        <h1 className="text-3xl font-bold mb-6 text-center text-black">
          {isEdit ? "게시글 수정" : "게시글 작성"}
        </h1>

        <div className="space-y-4">
          <div>
            <label htmlFor="title" className="text-sm font-semibold mb-1">
              제목
            </label>
            <input
              id="title"
              {...register("title", { required: true })}
              className="w-full p-2 border rounded bg-[rgb(239,246,255)]"
            />
            {errors.title && (
              <p className="text-red-500 text-sm mt-1">제목을 입력해주세요.</p>
            )}
          </div>

          <div>
            <label htmlFor="author" className="text-sm font-semibold mb-1">
              닉네임
            </label>
            <input
              id="author"
              {...register("author", { required: true })}
              className="w-full p-2 border rounded bg-[rgb(239,246,255)]"
            />
            {errors.author && (
              <p className="text-red-500 text-sm mt-1">
                닉네임을 입력해주세요.
              </p>
            )}
          </div>

          <div>
            <label htmlFor="password" className="text-sm font-semibold mb-1">
              비밀번호
            </label>
            <input
              type="password"
              id="password"
              {...register("password", { required: true })}
              className="w-full p-2 border rounded bg-[rgb(239,246,255)]"
            />
            {errors.password && (
              <p className="text-red-500 text-sm mt-1">
                비밀번호를 입력해주세요.
              </p>
            )}
          </div>

          <div>
            <label htmlFor="content" className="text-sm font-semibold mb-1">
              내용
            </label>
            <textarea
              id="content"
              rows={10}
              {...register("content", { required: true })}
              className="w-full p-2 border rounded bg-[rgb(239,246,255)]"
            />
            {errors.content && (
              <p className="text-red-500 text-sm mt-1">내용을 입력해주세요.</p>
            )}
          </div>

          <div className="flex justify-end space-x-2">
            <Link
              href="/"
              className="px-4 py-2 border rounded hover:bg-gray-100"
            >
              취소
            </Link>
            <button
              type="submit"
              className="bg-[rgb(80,147,234)] text-white px-4 py-2 rounded hover:bg-[rgb(44,120,221)]"
            >
              {isEdit ? "수정하기" : "작성하기"}
            </button>
          </div>
        </div>
      </form>
    </main>
흠.. 강의를 봅세요
"use client";

import { useState, useEffect } from "react";
import { useSearchParams } from "next/navigation";
import Link from "next/link";

export default function Write() {
  const searchParams = useSearchParams();
  const postId = searchParams.get("id");
  const isEdit = !!postId;

  //입력값마다 개별 useState()로 별도의 상태 관리
  const [enteredTitle, setEnteredTitle] = useState("");
  const [enteredAuthor, setEnteredAuthor] = useState("");
  const [enteredPassword, setEnteredPassword] = useState("");
  const [enteredContent, setEnteredContent] = useState("");

  useEffect(() => {
    if (isEdit) {
      // 기존 게시글 데이터 (임시)
      setEnteredTitle("기존 게시글 제목");
      setEnteredAuthor("기존 작성자");
      setEnteredPassword("");
      setEnteredContent("기존 게시글 내용");
    }
  }, [isEdit]);

  const handleSubmit = (event: React.FormEvent) => {
    event.preventDefault();
    // 게시글 작성/수정 로직 구현

  };

  return (

  );
}
폼 항목 여러개니까 일괄처리하려고 form이라는 하나의 객체로 모든 필드 관리
useRouter로 홈으로 이동
'use client';

import { useState, useEffect } from 'react';
import { useRouter, useSearchParams } from 'next/navigation';
import Link from 'next/link';

interface PostForm {
  title: string;
  author: string;
  password: string;
  content: string;
}

export default function Write() {
  const router = useRouter();
  const searchParams = useSearchParams();
  const postId = searchParams.get('id');
  const isEdit = !!postId;


  //폼 항목 여러개니까 일괄처리하려고 form이라는 하나의 객체로 모든 필드 관리
  const [form, setForm] = useState<PostForm>({
    title: '',
    author: '',
    password: '',
    content: '',
  });

  useEffect(() => {
    if (isEdit) {
      // 수정 시 기존 게시글 데이터 가져오기
      // 임시 데이터 (나중에 API 연동 시 제거)
      setForm({
        title: '기존 게시글 제목',
        author: '기존 작성자',
        password: '',
        content: '기존 게시글 내용',
      });
    }
  }, [isEdit]);

  const handleSubmit = (event: React.FormEvent) => {
    event.preventDefault();
    // 게시글 작성/수정 로직 구현
    router.push('/');
  };

  const handleChange = (
    e: React.ChangeEvent<HTMLInputElement | HTMLTextAreaElement>
  ) => {
    const { name, value } = e.target;
    setForm((prev) => ({
      ...prev,
      [name]: value,
    }));
  };

  return (
    ....
  );
}
react-hook-form : 폼 상태를 자동으로 관리하고, 유효성 검사도 처리해주는 라이브러리
https://velog.io/@boyeon_jeong/React-Hook-Form
[React Hook Form] react hook form 기본 예시 따라하기
🕐❗❕❓❔🔅⚠⛔❌⭕✔➕➖✖💣💰📔📖🔗🏆🔥⚡😀😎🤓😭😵😲😨😱😮😪😩❤🧡👀☠React Hook Form은 React 유효성 검사와 폼 관리를 단순화하는 강력한💣 라이브러리입니다. 이 라
velog.io
"use client";

import { useEffect } from "react";
import { useRouter, useSearchParams } from "next/navigation";

import Link from "next/link";
import { useForm } from "react-hook-form";

import axios from "axios";

interface PostData {
  title: string;
  author: string;
  password: string;
  content: string;
}

export default function Write() {
  const searchParams = useSearchParams();
  const postId = searchParams.get("id");
  const isEdit = !!postId;

  const router = useRouter();


  // react-hook-form 라이브러리 사용
  // 자동 바인딩 + 유효성 검사 가능
  const {
    register,
    handleSubmit,
    setValue,
    formState: { errors },
  } = useForm<PostData>();

  useEffect(() => {
    if (isEdit && postId) {

      const apiURL = "http://3.35.233.169:8080/swagger-ui/index.html#/";
      const endpoint = "/~~~~"; // 버에 안들어가져서 모르겠네염

      axios
        // GET으로 폼 작성햇던 데이터 받아오기
        .get(`${apiURL}${endpoint}/${postId}`)
        .then((res) => {
          const { title, author, password, content } = res.data;
          setValue("title", title);
          setValue("author", author);
          setValue("content", password);
          setValue("content", content);
        })
        // 요청 실패시 오류 처리
        .catch((err) => {
          console.error("폼 불러오기 실패:", err);
        });
    }
  }, [isEdit, postId, setValue]); //isEdit, postId, setValue 중 하나가 변경될 때마다 실행

  const onSubmit = async (data: PostData) => {
    const apiURL = "http://3.35.233.169:8080/swagger-ui/index.html#/";

    try {
      if (isEdit && postId) {
        //PUT으로 수정 시 덮어쓰기 해주기
        await axios.put(`${apiURL}/posts/${postId}`, data);
        alert("폼 수정완료");
      } else {
        // isEdit이 아닌 경우 (즉 작성하기일떄) POST 로 데이터 전송
        await axios.post(`${apiURL}/posts`, data);
        alert("폼 작성완료");
      }
      router.push("/"); // 메인으로 이동하기
    } catch (error) {
      console.error("요청 실패:", error);
    }

    // TODO: API 요청 처리 (axios.post 또는 axios.put)

    router.push("/");
  };
  return (
    ....
  );
}
취소 버튼 빼고... 상단 이전으로 버튼 추가
        <Link href="/" className="text-blue-500 hover:underline mb-4 block">
          ← 이전으로
        </Link>